Why a Peugeot Boxter makes a good choice for van conversion – Peugeot Boxer is more affordable without compromising reliability.
Things you’ll learn about,
What are the steps taken to convert your van? What order did you do them? Why did you choose the Peugeot Boxer over all the others v’s Ford Transit, Vauxhall Vivaro, VW Transporter, Mercedes Benz Sprinter etc How did you plan & tackle the project? What were the main problems or obstacles that you faced, and how did you solve them? What materials did you use? Where did you get your materials from? How much did it cost? What did you do yourselves? What was the whole van cost?
Writer: Daniela R for Vanbandits
Read time: 17-21mins
Focus: Real campervan conversion in the UK – plan, steps, materials, cost.
Two years ago, my partner and I carried out a Peugeot Boxer Van conversion ahead of a big trip to Europe. After extensively researching the best vans for conversion we chose the Peugeot boxer van. We spent loads of time researching the benefits of the make and model for the campervan we wanted to create!
“We have become experts in Peugeot campervan conversions and it’s the exact model we would recommend to anyone like us embarking on a similar project!”
This guide is all about sharing our journey of the Peugeot Boxer van conversion step by step. Whether you’re just starting to plan your van conversion journey or ready to begin the build, we’ll cover everything you need to know.
We’ll cover everything from planning and insulating to wiring and adding those finishing touches. Along the way, we’ll talk about what went well, the hiccups we ran into, and tips we picked up that could save you time and hassle. By the end, we hope you’ll feel ready to tackle your own Peugeot van conversion project with a bit more confidence and some real excitement!
Table of Contents
ToggleWhy the Peugeot Boxer for Van Conversion?
When deciding which van to convert, we compared popular options like the Ford Transit, Vauxhall Vivaro, VW Transporter, and Mercedes-Benz Sprinter. Here’s why the Peugeot Boxer came out on top:
- Plenty of Space: The Boxer has a wider interior than most; this was the main attraction because it would allow us to sleep sideways orientated. Other vans like the Sprinter are only slightly narrower, but the extra gained by sleeping sideways frees up so much space with the rest of the design.
- Better Value for Money: Compared to similar vans, the Peugeot Boxer is more affordable without compromising reliability. This is partly why they are so commonly used as delivery trucks.
- Easy to Maintain: Parts are widely available, and maintenance costs are reasonable – crucial for budget-conscious van life. This makes it a reliable choice for a DIY project. We also knew we were taking the van to Europe and so there was a great appeal for a model that used generic parts and would be well-known in garages across the continent.
- Practical Design: Although we didn’t particularly choose it for this reason, the boxy shape made it easier to insulate and fit panels, saving time and effort during the build.
Availability: Peugeot Boxers are easier to find on the UK market, and there’s a good range of second-hand options. They are very commonly used as delivery vans, so finding slightly older models is easy, and therefore, they come at a good price.
How Long Will My Peugeot Boxer Conversion Take?
One of the first questions we asked ourselves was, “How long is this going to take?” The answer, of course, depends on how much time you can dedicate each week and whether you’re tackling everything solo or with help. To give you a rough idea, here’s how long each stage of the process took us:
- Preparation and Cleaning (1–2 days) Stripping out old fittings, cleaning the interior, and dealing with any rust or repairs took a couple of days. It’s not glamorous work, but it’s a solid start.
- Insulation (2–3 days) Installing insulation took a bit longer as we wanted to do it properly. Cutting foam boards and sealing every gap can be a bit fiddly, but it’s worth the effort.
- Flooring (1 day) Laying down plywood and vinyl flooring was fairly quick, especially with two people on the job.
- Wiring and Electricals (4–5 days) This stage involved running wires for lights and outlets, installing a leisure battery, and setting up the solar panel system. If you’re new to electrics, allow some extra time to get it right.
- Walls and Ceiling (2–3 days) Fitting plywood panels and adding a nice finish with paint or fabric took us a few days. The Peugeot Boxer’s square-ish shape made this stage easier than it might be in other vans.
- Ventilation (1 day) Installing a roof vent and any additional airflow solutions was a quick win and made a big difference to the feel of the space.
- Plumbing (2 days) Setting up the water tank, sink, and simple pump system took us two days, mainly due to getting the fittings just right.
- Furniture Building (5–7 days) Building a bed frame, cabinets, and a kitchen countertop was one of the most time-consuming stages. It’s where your creativity gets to shine, but it can be a bit of a marathon.
- Appliance Installation (1–2 days) Installing the fridge, stove, and any other appliances was relatively quick once the furniture was in place.
- Decor and Personal Touches (1–2 days) Adding cushions, curtains, and a bit of wall art was the fun part and didn’t take long at all.
- Testing and Adjustments (1–2 days) Finally, we tested all the systems, made tweaks where needed, and gave everything a final check.
Total Time Estimate – fulltime ripping it = 20 days + 2 weeks allowance research/finding parts/ordering parts
– fulltime quick work = 30 days + 2 weeks allowance research/finding parts/ordering parts
If you know what you are doing and can work on this full-time, it might take 3-4 weeks. If you need to learn the skills (plumbing/carpentry/electrics etc) it could take much longer, definitely allow for much more time at each stage to get the hang of each specific task.
If you can only work part-time on the project, it will take longer. Another thing to consider is that 2 people working don’t always half the time as the van is small and sometimes you can really only do one job at a time without getting in each other’s way.
Other delays can come from the weather – you might need to wait for a sunny day to cut the windows, for example. Also, we often worked on our van in the evenings or on weekends around our jobs, and some of these hours would have been antisocial for drilling/cutting and machine sanding, considering we live on a road very close to neighbours.
Our van took about 6 months to convert, and that was part-time work for two of us with little experience. We didn’t have a dedicated workspace, so this time included clearing up and hoovering each day. I think this would have been a bit quicker in a designated work space.

Planning the Peugeot Boxer Van Conversion
Let’s face it: diving into a van conversion can feel a bit overwhelming at first. That’s why planning is so important. We spent a fair bit of time doing our homework to make sure we knew exactly what we were getting into. Here’s how we approached it:
- Research: We got lost in a rabbit hole of van conversion blogs, YouTube tutorials, and forums. Seeing how others tackled their projects helped us avoid common mistakes and sparked some great ideas for our build.
- Layout Design: Sketching out our ideal layout was a bit like playing Tetris. We prioritised the essentials—a comfy bed, a functional kitchen, and plenty of storage—while making sure everything would fit comfortably in the Boxer’s generous space.
- Budgeting: We crunched the numbers to estimate what we’d need to spend on materials, tools, and the occasional bit of professional help. Spoiler alert: it’s easy to get carried away, so having a clear budget kept us on track.
- Timeline: Knowing we couldn’t do it all in a weekend, we broke the project into smaller milestones. As it turned out, our timeline was totally unrealistic, so read on to find out the suggestions we are making for time planning the project based on our experience!
- Tools and Materials: Finally, we made a list of all the van conversion tools we’d need and started sourcing materials from local suppliers, online stores, and even some cheeky Facebook Marketplace finds.
Where to convert my Peugeot boxer?
An important thing to think about is the workspace. Where will you carry out the build? If it’s winter, you will have problems with dampness and light doing it outdoors, so just consider the mess that will be created if you’re doing the work indoors to carry outside.
Alternatively, you
“could consider putting up a tent or gazebo outside if there’s space to keep things dry while you’re sawing/cutting and screwing.”
Another thing to consider is where the van will be parked. If you have a driveway, that’s great. If it’s on a slope, you can always use levellers to get the van straight, as this will help with the build. If the van is parked on the street, things like the power supply to the van might need a little more planning.
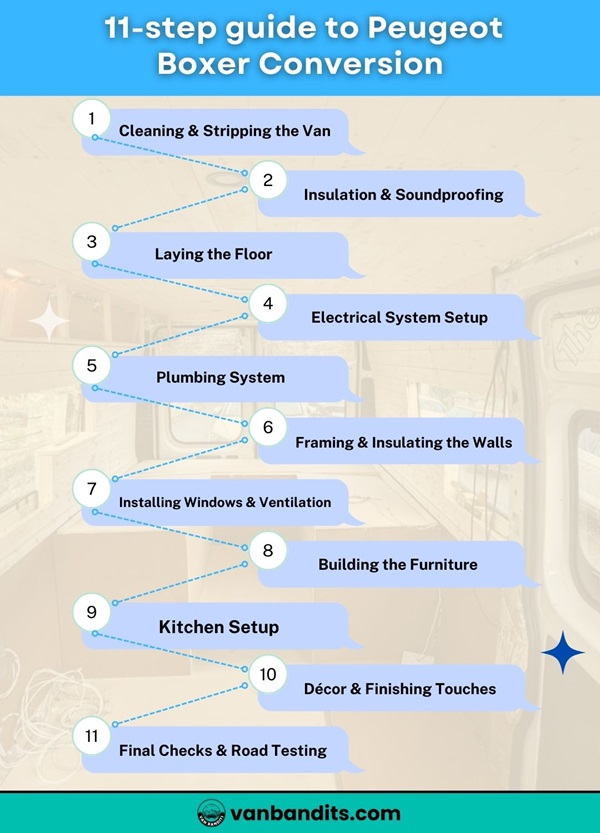
11-step guide to converting a Peugeot boxer
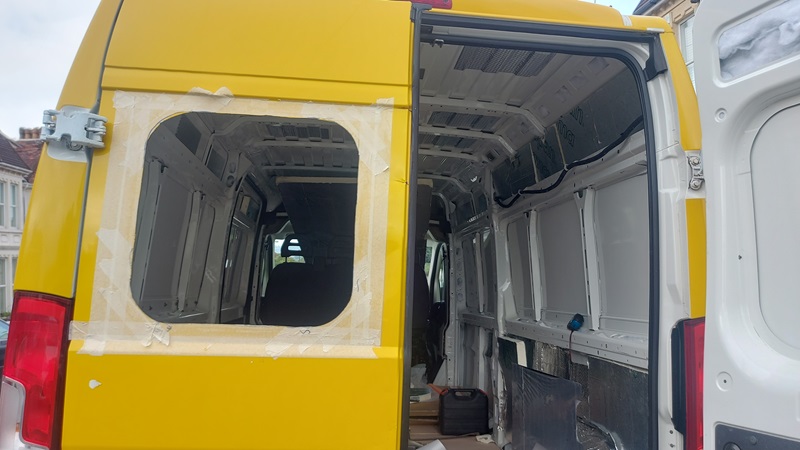
Step 1: Cleaning and Stripping the Van
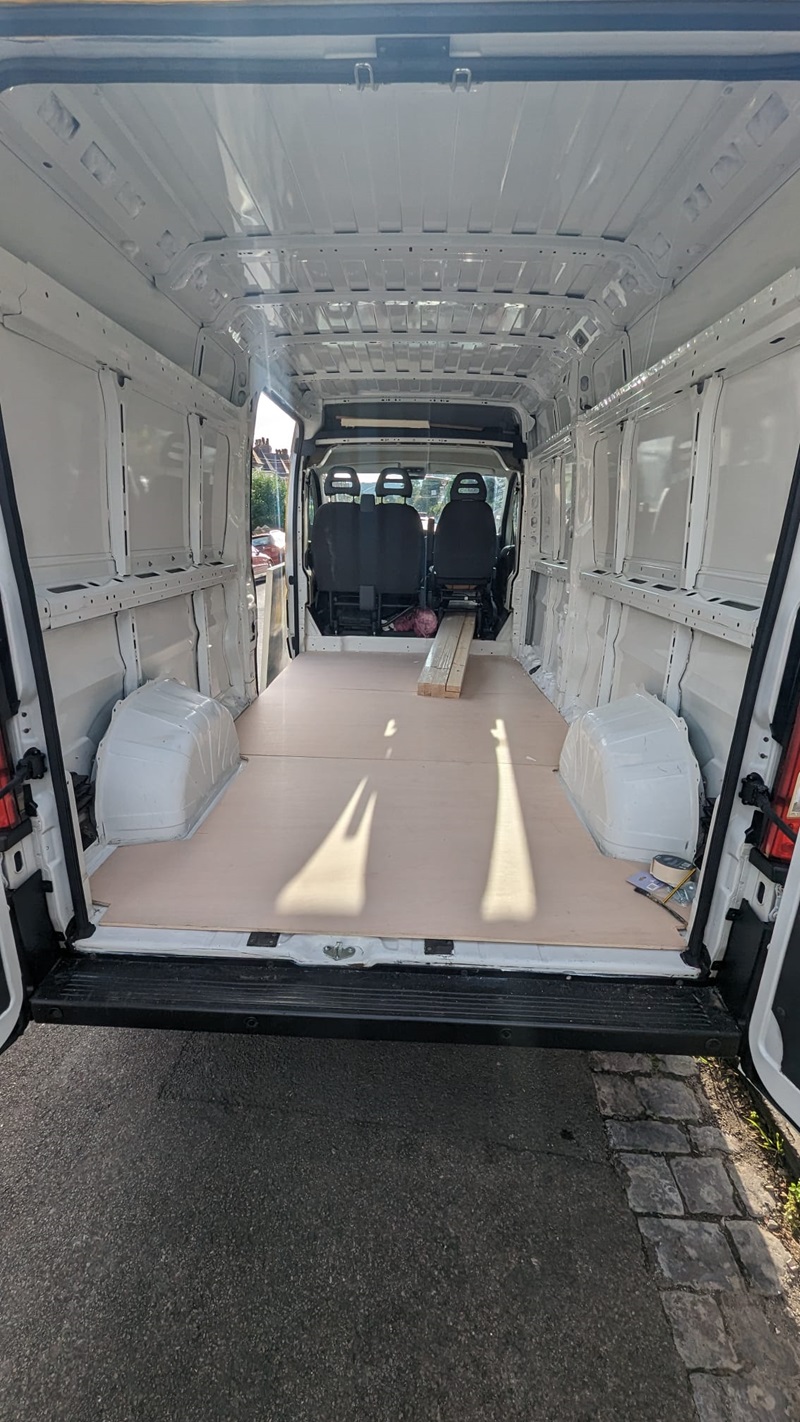
The first step in your conversion journey is to strip the van down to its bare bones. This stage is all about preparing a clean, solid foundation for your build.
Start by removing anything you don’t need—seats, wall panels, flooring, and any lingering fixtures. Inspect every inch of the van for rust, damage, or weak spots.
“If you find any rust patches, tackle them head-on with a good rust treatment and primer to ensure they don’t come back to haunt you later. We used an anti-rush paint that we bought from our local Wix.”
This step might feel labour-intensive, but a clean and solid base will make every other stage much easier. Also, a clean van makes a great starting point for a before and after-photo!
Tools Needed: Screwdrivers, spanners, sandpaper, wire brushes, dustpan and brush or vacuum.
Materials Needed: Rust primer, anti-rust paint.
Costs: Tools: approx. £50 (if not already owned). Rust treatment materials: approx. £25.
Step 2: Insulation and Soundproofing
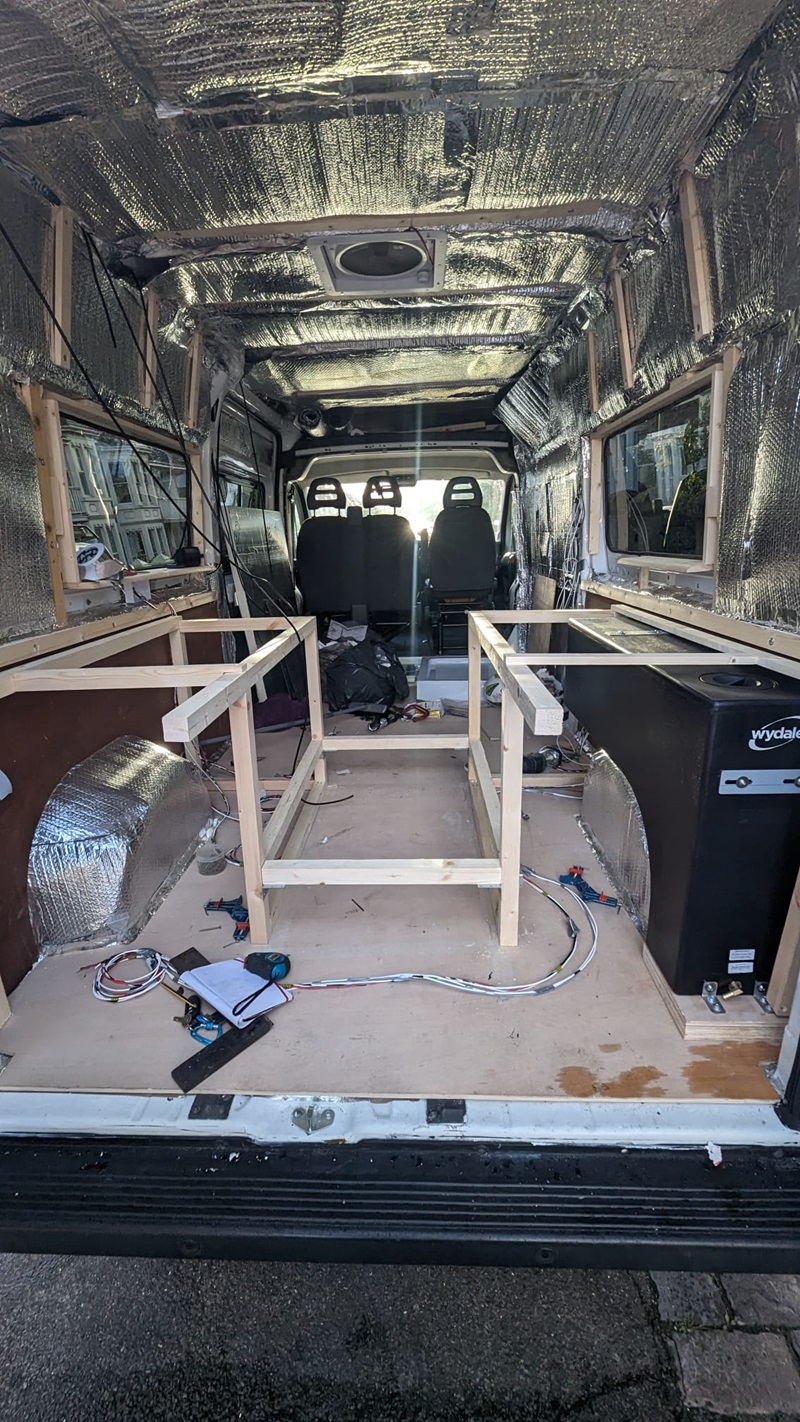
Creating a comfortable living space starts with proper insulation and soundproofing. This will be so well appreciated on chilly mornings or noisy nights. This is going to be your home, and you’ll want it to feel warm and peaceful.
There are plenty of options for insulation materials—foam boards are affordable and easy to use, and sheep’s wool is sustainable and great for temperature regulation.
We used foam boards everywhere and synthetic wool to stuff into the areas that were too small for foam boards. We then covered the insulation with a layer of reflective moisture insulation barrier.
We also included noise-dampening insulation strips, also known as soundproofing pads. This is well worth looking into for your build. This meant four different types of insulation in total, but we are really pleased we went full out here as this is something you feel every day and was very important to us.
Winter is the ultimate test of van life, and having and plan about how to keep warm and cosy in your van, will certainly pay off later.
Tools Needed: Utility knife, spray adhesive, measuring tape.
Materials Needed: Foam boards (approx. £40 per board), sheep’s wool (approx. £60 per roll), spray foam (approx. £20 per can), reflective/moisture insulation rolls (approx. £25 per roll), soundproofing insulation (approx. £35 per pack)
Costs: Total: approx. £200.
Step 3: Laying the Floor
Flooring is the foundation of your van’s interior and sets the tone for the overall aesthetic. Begin with a subfloor—plywood sheets work well as they’re both lightweight and sturdy. Secure the subfloor using screws or adhesive, making sure it’s level.
Next, choose your top layer. Vinyl flooring is a popular choice for its durability and water resistance.
Initially, we went with a light wooden effect laminate, but would opt for a much darker shade in future as it gets grubby really quickly!
We actually put down plywood but only placed the laminate in the exposed area. We still have plywood under the bed seats in our van, but we might choose to fit this at an earlier stage if we were to remodel.
Tools Needed: Jigsaw to cut plywood, drill, measuring tape, cutting knife of strong scissors for the laminate.
Materials Needed: Plywood sheets (approx. £40 each), vinyl flooring (approx. £50 per roll), screws and adhesive.
Costs: Total: approx. £120.
Step 4: Electrical System Setup
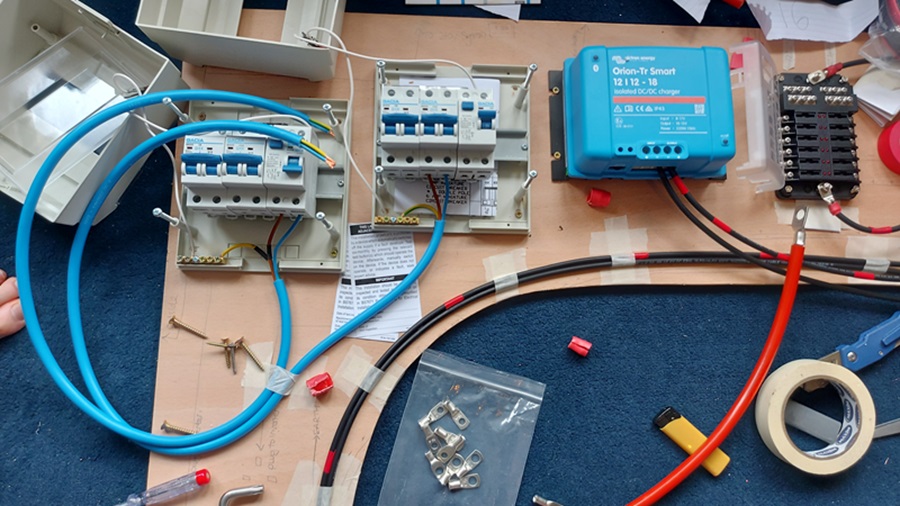
Your electrical system is the lifeline of your camper van. This step can feel daunting, but there are loads of online tools that can help you spec your system and find out what you need. We love the vunked site where you can find the sizing for all the equipment you need.
They also give you a wiring diagram and quote for the project. You don’t have to order through the site, but we ended up feeling like the price was pretty good compared with what else we saw on the market, and really value the experience of having everything arrive together from one place with the bespoke wiring diagram!
When it comes to wiring, it’s great to map everything out and then cut wires to size to minimise the risk of miscutting and having to order more. That said, I miss-cut quite a few, and that’s just how it goes when you’re learning a new skill.
“Pro tip: buy cable ties and cable management hooks from the offset to keep everything tidy while working, this makes checking the system at the end so much easier.”
Tools Needed: Wire crimper, screwdrivers and screws, wire cutter.
Materials Needed: Consider installing solar panels on your campervan, leisure batteries, inverter, AD/DC charger, electrical socket, consumer units, fuses, cables, lugs, heat shrink, any monitoring devices…really it depends on the system it could be more or less than the items listed here but this is what we went for.
I haven’t added prices as it depends so much on the sizing and the needs you will have in your van but all of that information is available for free on the Vunked site I suggested above.
Costs: Total: approx. £800.
Step 5: Plumbing System

How much plumbing do you need in your van? There are simple ways to do this, as well as more house-like, fully plumbed ways. Plumbing in systems nicely will add a homey, luxurious feeling.
You’ll probably start with a freshwater tank and connect it to a water pump for running water at your sink or shower. Flexible pipes will help you route water efficiently. Don’t forget a grey water tank to collect waste water—it’s essential for eco-friendly van life. Portable water containers are an alternative if you want a simpler setup.
Secure all components for travel – we had our waste water spill once on the road while we drove up the windy roads of a mountain and I would urge everyone not to make the same mistake!
Tools Needed: Drill, screwdriver, plumbing fittings, pipe cutter.
Materials Needed: Water tank (approx. £60-120), water pump (approx. £40), pipes and fittings (approx. £30), grey water tank (approx. £50).
Costs: Total: approx. £180-200.
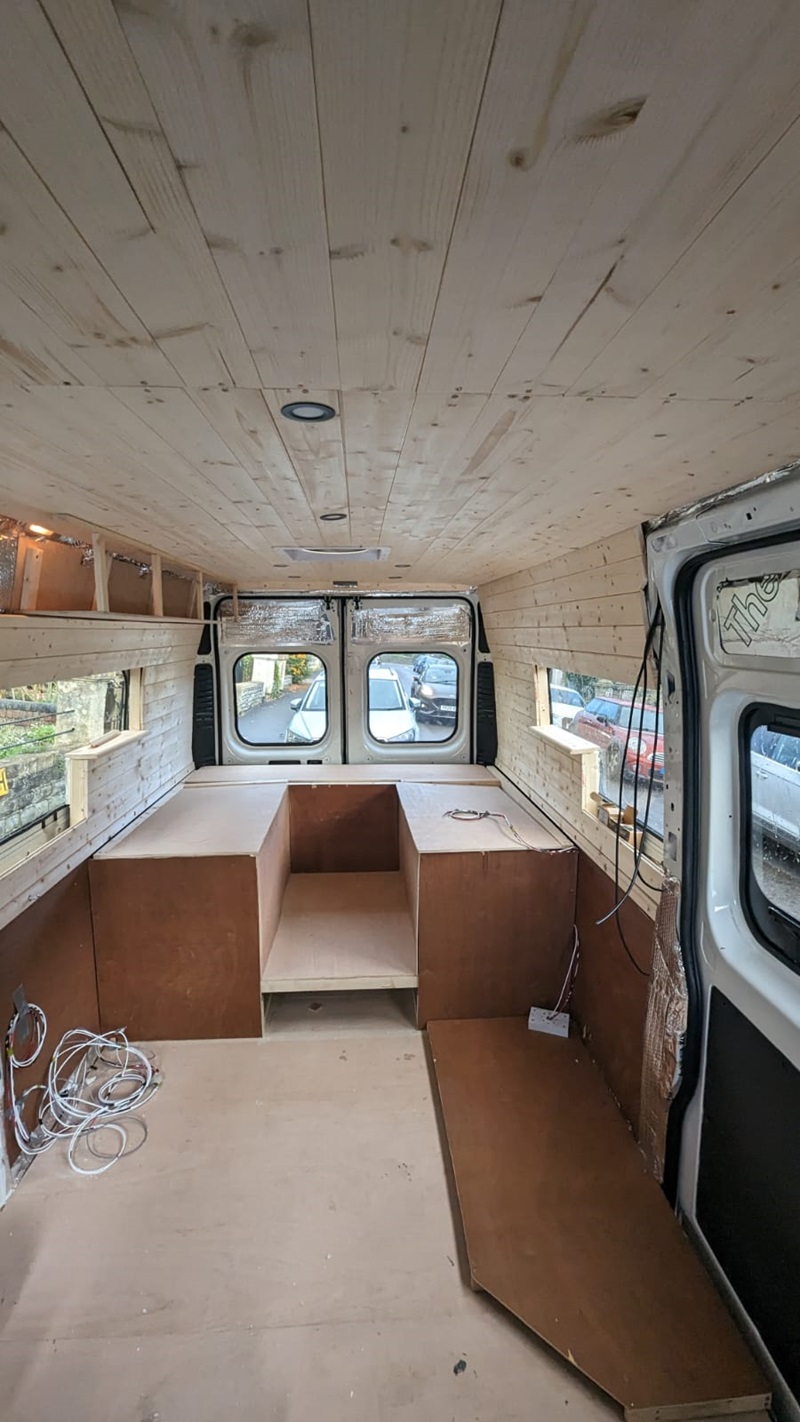
Step 6: Framing and Insulating the Walls
Framing the walls is where your van starts to take shape and this is a really exciting moment in the build. You can cover the insulation with plywood panels that you can paint as a simple option, or, we love the look of wooden battens for a more luxury/natural feel inside.
Whatever you opt for, everything will need to be cut to size and screwed into place. This step is as much about functionality as it is about aesthetics so think about this alongside the design of your van and the atmosphere you want to create inside.
Tools Needed: Saw, drill, measuring tape.
Materials Needed: Wooden battens (approx. £20), plywood sheets (approx. £40 each).
Costs: Total: approx. £150.
Step 7: Installing Windows and Ventilation
Adding windows and vents transforms your van into a bright, airy space. If you’re not confident yourself, this is something you could outsource, but it is very manageable. We used the company vanpimps and bought their full kit with all the materials included.
Start by measuring and cutting openings in the van’s body. This part can be nerve-wracking, but precision is your best friend. Install windows using the provided seals and trim, ensuring a watertight fit.
You will definitely want to think about some sort of ventilation – not only for comfort but as part of the legal requirement for living in a van. Roof vents are great. A powered fan adds extra airflow and helps prevent condensation. We used the powered fan all the time, definitely while cooking and also to cool us down in hot weather.
Tools Needed: Jigsaw with metal cutters, sealant gun (high strength).
Materials Needed: Windows (approx. £120 each), roof vent fan (approx. £150), sealant and trim.
Costs: Total: approx. £450.
Step 8: Building the Furniture

This is where your van starts feeling like home – and it’s so exciting to see everything coming together. Here’s where you can build or install essential furniture like a bed frame, cabinets, and countertops. Lightweight wood is ideal to avoid adding unnecessary weight.
“Try to design pieces that maximize storage—hidden compartments are your best friend in a small space.”
If carpentry isn’t your thing, flat-pack or pre-built options can save time and effort. This is worth thinking about and playing around with to make sure you’re doing all you can to have the space suit your needs.
Tools Needed: Circular saw, drill, screwdriver.
Materials Needed: 2 x 4 lightweight wooden beams (12 each) Plywood (approx. £40 each), screws and hinges (approx. £20).
Costs: Total: approx. £150.
Step 9: Kitchen Setup
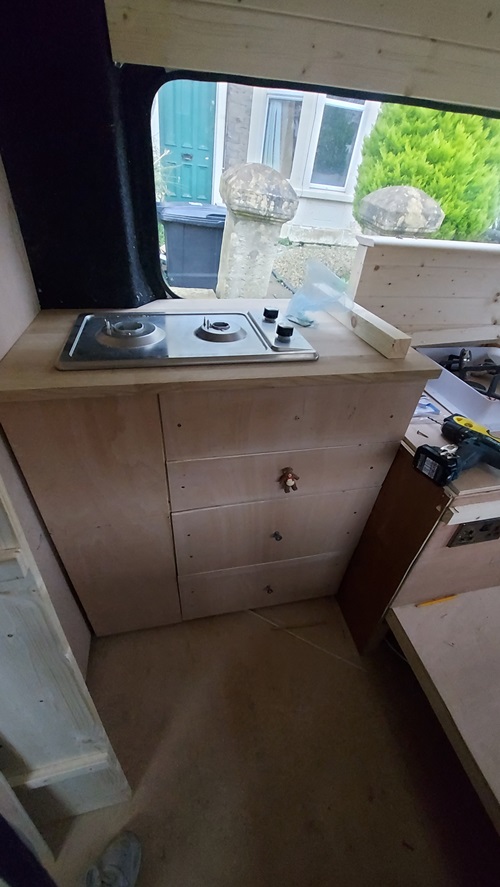
Your kitchen is the heart of your van. Think about the sink and stove set-up you want. Some people opt for portable camping stoves, but we wanted a more homely feel.
There are lots of compact stove/sink combi designs especially made for campervans, so browse some options and see what you have space for.
We actually went for full-size regular appliances as we love cooking our own food in the van and we wanted it to feel like home! This did mean we sacrificed some workspace and cabinetry, but it was worth it for us.
Think about the countertop. We went for an expensive one, as we think this really adds luxury to the van and this is how we wanted the kitchen to feel.
Tools Needed: jigsaw, screws and screwdrivers, seals, silicone.
Materials Needed: Sink (approx. £80), camping stove (approx. £40), stove (approx. £80), worktop (approx. 100) storage boxes (approx. £30).
Costs: Total: approx. £120.
Step 10: Decor and Finishing Touches
Finally, bring your van to life with personal touches. Paint walls, add cushions and curtains, and install soft lighting to create a cosy atmosphere. Practical additions like hooks and storage bins keep things organised. Think about what makes you feel at home and add those elements—it’s these finishing touches that turn a van into your sanctuary.
Materials Needed: Paint (approx. £60), cushions and curtains (approx. £50).
Costs: Total: approx. £150.
Step 11: Final Checks and Road Testing

Before hitting the road, double-check everything. Test your electrical and plumbing systems, inspect for leaks or loose fittings, and ensure all furniture is secure. A short test trip is a great way to identify any tweaks needed before embarking on your big adventure.
At this stage, leave time and some available budget because there are bound to be last-minute fixes and adjustments. We didn’t realise we had a leak from our backdoor because the spot where the van was parked had a sideways slope that directed water away from the leak – there was no way we could have known this until we tried it out!
Before hitting the road also ensure you’re familiar with campervan insurance requirements and parking regulations in the UK.
Peugeot Boxer self-build challenges and solutions

Challenge 1: Time management – when it’s not a full-time project.
We converted our van alongside one full-time job and one part-time PhD. This means that not only did we have much less work time, but much less research time and overall, the build took so much longer than we expected or than what was quoted on some of the sites and blogs we were reading.
This means we had much less time to fix issues at the end than we would have liked, so we recommend building in time to test run and problem-solve at the end.
Challenge 2: Budget constraints – and how to plan when you have no idea!
We have tried to provide an accurate cost profile for this type of project if you are buying things in a hardware shop and doing a high-quality conversion job.
There are many ways to save money, but on hindsight this is an accurate depiction of a high-quality finish if you don’t have time to go around finding second-hand items and salvaging things from scrapyards. With more time, this could have been a fun way to approach it but that wasn’t the situation we were in.
Challenge 3: The learning curve of acquiring new skills (e.g., wiring, plumbing, or carpentry).
Allow time for learning new skills and if necessary, order more equipment so that you have spares to practise on. Be patient with yourself. It can be frustrating when you have a job that needs doing and it’s taking you ages to learn a skill but it’s a great experience.
Cost to convert a Peugeot Boxer
Including the purchase of the van (£12,000), the total cost came to around £21,000. I would like to add, however, that we really valued high-spec comfort systems, so we designed a system that we knew would be more on the expensive side, but that would feel like we were living in a home and less like we were in a camping set-up. This meant a wet room shower, a big, refillable gas canister, full size and spec hob and sink, a big leisure battery with 3-way charging, solar panels, lots of lighting and electrical sockets, plumped water from a huge storage tank and other such choices.
Lots of people go down a very scrappy and low-cost pathway, using a lot of reclaimed items and those projects are amazing! We love reading them but we were slightly tight on time with our conversion ahead of our trip, and we opted for more off-the-shelf, slightly higher-cost options.
Conclusion
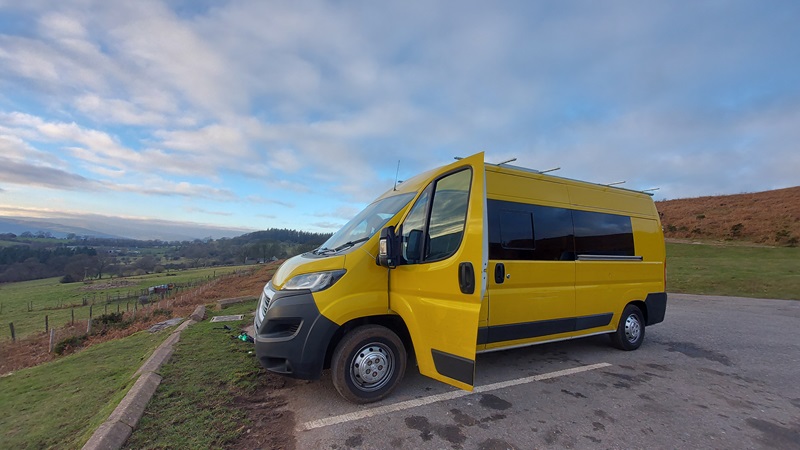
We love our Peugeot boxer and we couldn’t be happier with the conversion job we’ve done. Living out of a van you have converted is so satisfying and everything you touch has a memory or story associated.
For us, the Peugeot boxer van was a perfect balance of size, availability and low cost. We would definitely recommend it to friends and family who ask. It’s also great because there are plenty of conversions online to reach for inspiration.
If you’re thinking of embarking on your conversion, we encourage it! This was such a rewarding job for us and this Peugeot boxer van conversion is one of the projects we are most proud of!
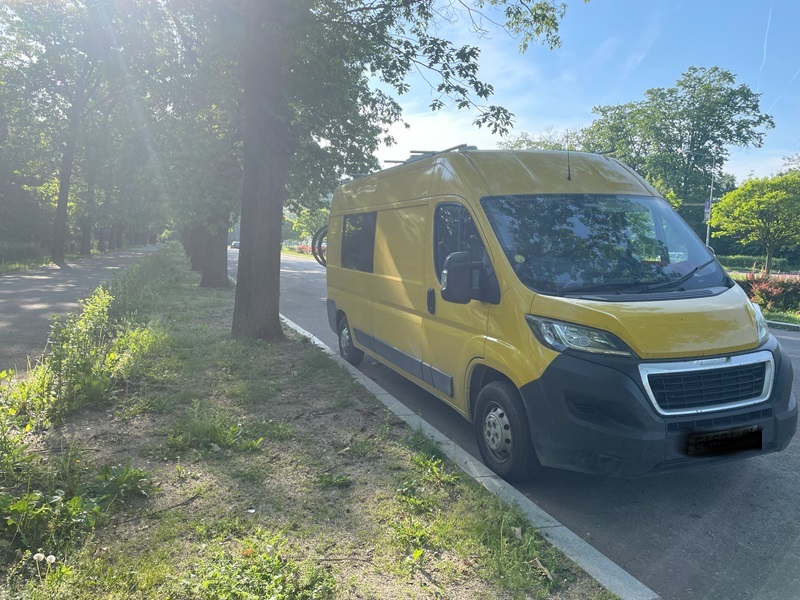
Other stories of Van lifers and life on the road and turning your van into a home. Also, Dani’s personal van life story in her yellow Peugeot Boxer across Europe.

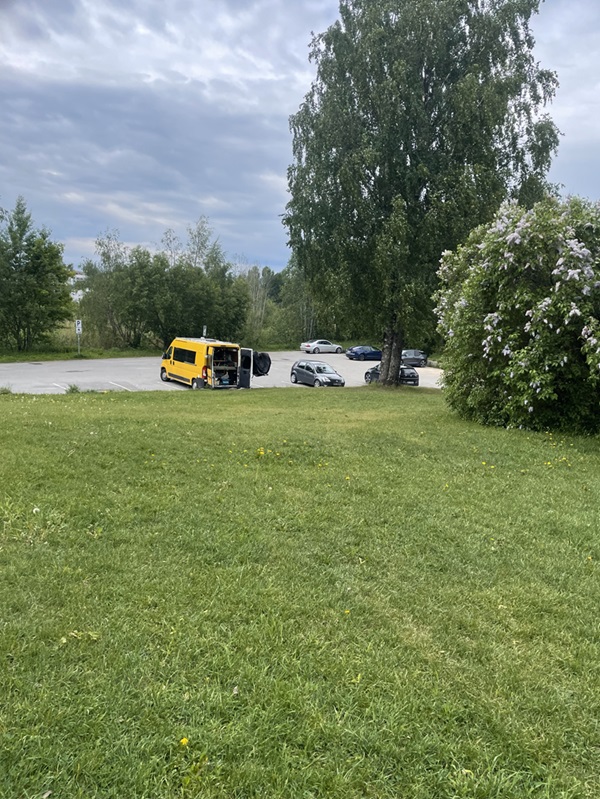
Dani does vanlife in her bright yellow Peugeot boxer called “Sunny”. Based in Bristol, UK, with her partner she DIY the complete van conversion of Sunny and then tripped around Europe. She now does vanlife around the UK. Outside van life adventures and trip planning, she works as a project developer in renewable energy. See Dani’s full vanbandits profile.
Related Posts


